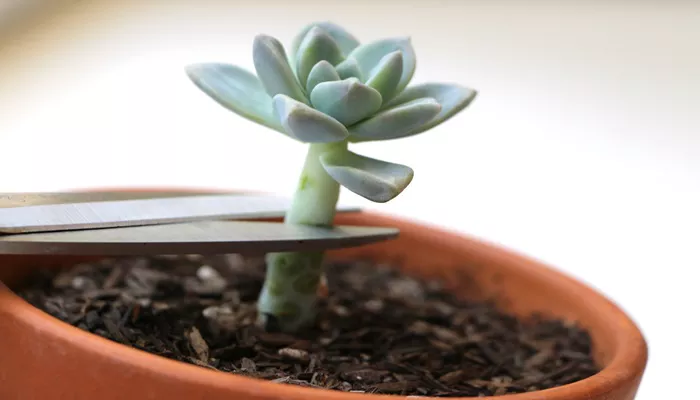
Succulents have captured the hearts of many gardening enthusiasts with their unique shapes, vibrant colors, and ease of care. Among the many methods to propagate these hardy plants, rooting succulent cuttings stands out as a popular and rewarding technique. Whether you’re a seasoned gardener or a novice looking to expand your succulent collection, this guide will provide you with a detailed approach to rooting succulent cuttings.
Understanding Succulent Cuttings
Succulent cuttings are simply sections of a succulent plant that are removed and grown into new plants. This method of propagation is popular because it allows gardeners to multiply their plants without the need for seeds. Succulents are particularly suited to this technique due to their ability to store water in their leaves, which helps them survive the initial stages of root development.
Types of Succulent Cuttings
Leaf Cuttings: This method involves removing a leaf from the succulent and allowing it to dry out before planting. It’s ideal for succulents with thick, fleshy leaves.
Stem Cuttings: For succulents with woody or semi-woody stems, stem cuttings are more appropriate. These cuttings include a segment of the stem and may also have a few leaves attached.
Preparing for Propagation
Before you start rooting succulent cuttings, it’s essential to gather the right tools and materials.
Essential Tools and Materials
Sharp Knife or Scissors: A clean, sharp blade ensures a clean cut and reduces the risk of infection.
Potting Mix: Use a well-draining mix specifically formulated for succulents or cacti.
Small Pots or Containers: Ensure these have drainage holes to prevent waterlogging.
Rooting Hormone (Optional): Though not always necessary, rooting hormone can help stimulate root growth.
Step-by-Step Guide to Rooting Succulent Cuttings
1. Selecting and Preparing Cuttings
Leaf Cuttings:
Choose a healthy leaf from the base of the plant. Gently twist the leaf until it detaches from the stem. Ensure that the leaf comes off cleanly with no remnants left on the stem.
Allow the leaf to dry out for 1-3 days in a shaded, dry area. This period is crucial for callusing, which helps prevent rot.
Stem Cuttings:
Select a healthy stem and use a sharp knife or scissors to cut a segment about 2-4 inches long. The cut should be made just below a leaf node (where leaves attach to the stem).
Remove any lower leaves to expose the nodes. Allow the cut end to dry out and callus for 1-2 days.
2. Planting the Cuttings
Leaf Cuttings:
Place the dried leaf on the surface of a well-draining potting mix. Do not bury it. The leaf should be in contact with the soil but not buried.
Stem Cuttings:
Insert the dried stem cutting about 1 inch into the potting mix. Firmly press the soil around the base of the cutting to ensure stability.
3. Caring for the Cuttings
Watering: Initially, water sparingly. Overwatering can lead to rot. Once you notice new growth or roots, you can gradually increase watering.
Light: Place the pots in a location with bright, indirect light. Direct sunlight can be too intense and may cause damage.
Temperature: Succulents thrive in warm temperatures. Keep the environment between 65-80°F (18-27°C).
4. Monitoring and Transplanting
Root Development: Check for roots by gently tugging on the cutting. Resistance indicates root growth. For leaf cuttings, new plantlets will start to form around the base of the leaf.
Transplanting: Once the cuttings have developed a strong root system and are showing new growth, they can be transplanted into larger pots or directly into your garden.
Common Challenges and Solutions
1. Rotting
Problem: Overwatering or high humidity can cause cuttings to rot.
Solution: Ensure proper drainage and reduce watering frequency. Allow the soil to dry out between waterings.
2. Failure to Root
Problem: Some cuttings may not develop roots due to improper handling or environmental conditions.
Solution: Ensure that cuttings are allowed to callus before planting and maintain optimal light and temperature conditions.
3. Pests
Problem: Mealybugs or aphids can infest succulent cuttings.
Solution: Regularly inspect your cuttings and use insecticidal soap or neem oil if pests are detected.
Innovative Ideas for Succulent Propagation
1. Using Hydrogel Crystals
Hydrogel crystals can help retain moisture around succulent cuttings, reducing the risk of overwatering and promoting healthier root development.
2. Creating Succulent Gardens
Once your cuttings have rooted and grown, consider combining various succulents in a single container to create a visually stunning succulent garden. This method allows for a diverse array of textures and colors.
3. DIY Terrariums
Use your rooted cuttings to create beautiful succulent terrariums. These can be both decorative and functional, providing a unique way to display your plants.
see also: How Do I Replant a Succulent?
Summary and Conclusion
Rooting succulent cuttings is a rewarding and accessible method of propagating your favorite plants. By understanding the types of cuttings, preparing them properly, and providing the right care, you can successfully grow new succulents from cuttings. The process not only expands your plant collection but also deepens your connection to gardening.
Succulent propagation through cuttings is more than just a gardening technique—it’s a journey of patience and discovery. As you nurture your cuttings from tiny segments to flourishing plants, you’ll gain a greater appreciation for the resilience and beauty of succulents. Embrace the process, experiment with new ideas, and watch your succulent garden thrive.
In conclusion, rooting succulent cuttings is an art that combines knowledge, patience, and a touch of creativity. By following the steps outlined in this guide, you’ll be well on your way to creating a lush and vibrant collection of succulents, each with its own story of growth and transformation. Happy gardening!


